If you’ve got a ceiling fan with an integrated light fixture in your home, you know the drill, reach for two separate chains, fumble in the dark, or get stuck with settings you didn’t want. A smart switch for ceiling fan with light changes that dynamic completely. These connected devices let you control both fan speed and brightness from your phone, voice commands, or automation schedules. Whether you’re retrofitting an existing setup or planning your smart home from scratch, understanding how a fan light smart switch works and what to look for will save you time, money, and frustration. This guide covers everything a DIYer needs to know.
Table of Contents
ToggleKey Takeaways
- A smart fan light switch replaces your standard wall switch to control both fan speed and light brightness independently via WiFi, voice commands, or automation, eliminating the need for dual-chain fumbling.
- Smart fan light switches can reduce cooling costs by 10–15% through energy-efficient scheduling, dimming, and air circulation optimization paired with air conditioning.
- Most smart switches require a neutral wire (white conductor) in your switch box; if absent, you’ll need an electrician to run a new one rather than attempting a DIY workaround.
- Verify compatibility before purchasing by confirming your fan’s voltage, motor specs, dimmer support, and the switch’s load rating to avoid flickering lights or motor damage.
- Start with simple app and voice control, then layer in automation scenes and geofencing triggers once comfortable to avoid overcomplicating your setup.
What Is a Smart Fan Light Switch?
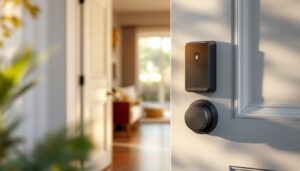
A smart fan light switch is a wall-mounted device that replaces your standard wall switch and controls both the ceiling fan motor and its integrated light fixture via WiFi, Bluetooth, or another wireless protocol. Unlike traditional toggle switches that offer simple on-off control, smart switches let you adjust fan speed (usually low, medium, high) and light brightness independently. Most models work with existing ceiling fan wiring, though some require a neutral wire (white conductor) at the switch box, something older homes don’t always have. The switch connects to your home WiFi network and communicates with a smartphone app, voice assistant, or smart home hub. Some units include scheduling, geofencing, and integration with platforms like Alexa, Google Assistant, or Apple HomeKit. Think of it as the grown-up version of that dual-chain control, minus the guesswork and midnight stumbling.
Key Features and Benefits
Energy Efficiency and Cost Savings
One of the biggest draws to upgrading is energy savings. A smart switch for ceiling fan with light lets you set schedules so the fan runs only when you’re home or awake, cutting runtime and power consumption. Ceiling fans paired with air conditioning can reduce cooling costs by 10–15% if you’re raising your thermostat a few degrees and relying more on air circulation. Smart dimming on integrated lights means you’re not running full brightness all day, lower settings consume noticeably less energy. Over a year, these small adjustments add up. Most smart switches also show real-time energy usage in their apps, helping you spot waste and make informed decisions about habit changes.
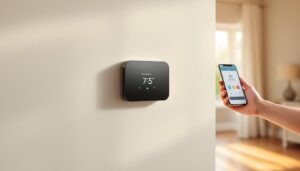
Convenience and Remote Control
Remote control is the headline feature, but convenience goes deeper. Imagine coming home in the dark and turning on the fan and light before you walk through the door. Or setting the fan to low and lights to 30% brightness automatically at 9 p.m. as part of your wind-down routine. Voice control, “Alexa, turn on the bedroom fan to medium”, eliminates the hunt for the wall switch, especially useful if your hands are full or you’re in bed. Geofencing triggers actions when you leave or arrive home. Some users set their fan to turn on a few minutes before they wake, creating gentle air circulation that makes getting out of bed less jarring. These aren’t revolutionary features, but they make daily life smoother.
Installation Basics for DIYers
Before you grab a screwdriver, verify two things: your ceiling fan’s wiring capacity and whether your switch box has a neutral wire. Most smart fan light switches require a neutral conductor to power the wireless electronics: if your existing switch box only has live (black), switched (red), and ground (green or bare copper), you’ll need an electrician to run a new neutral from your breaker panel or junction box. This is not a DIY fix if it’s absent.
Assuming you have the wiring, here’s the process:
- Turn off power at the breaker and verify it’s off with a non-contact voltage tester.
- Remove the old switch by unscrewing wire terminals and noting wire positions (photograph them). Typically you’ll find black (hot), red (fan control), and a neutral.
- Connect the smart switch following the manufacturer’s diagram. Terminals are usually clearly labeled: hot in, load out, neutral, ground. Most smart switches are color-coded internally, don’t guess.
- Secure the switch in the box and install the face plate.
- Restore power and test manually before adding it to your WiFi network.
If your ceiling fan is already hardwired, no wall switch, or if the wiring looks corroded or uncertain, call a licensed electrician. Mistakes here can damage the fan motor or create a fire hazard. The job typically runs $150–300 for a professional, which beats troubleshooting a fried fan and switch down the road.
One more safety note: always work on circuits with power off and verify with a tester. Ceiling fan circuits often run 20 amps: touching live terminals is dangerous.
Choosing the Right Smart Fan Light Switch
Not all smart switches work with all ceiling fans. Here’s what to evaluate:
Voltage and Motor Compatibility: Fans usually run 120V AC motors: most smart switches handle this, but confirm the specs match your fan. Some high-end or specialty fans have different requirements.
Smart Home Ecosystem: If you own Amazon Alexa devices, pick a switch with native Alexa support, no extra hub needed. Google Home users should verify Google compatibility. Apple HomeKit fans will want HomeKit certification. Mixing ecosystems works, but it requires additional bridges and app juggling.
Neutral Wire Requirement: As mentioned, many smart switches need a neutral. A few battery-powered or wireless-only models skip this, but they’re pricier and have limited functionality. The mainstream option, wired with neutral, is more reliable and feature-rich.
Dimming Range: Not all lights and fans play nicely with dimmers. Check that your fan’s light fixtures support the switch’s dimming range (usually 10–100% in 5% increments). Some LED bulbs flicker or buzz if the dimmer isn’t compatible: a quick call to the fan manufacturer or reading reviews mentioning your exact fan model saves headaches.
Load Rating: The switch must handle your fan’s wattage. Most residential ceiling fans draw 50–100W for the motor: integrated lights add 40–60W. Add them up and confirm the switch’s load rating exceeds the total. A 300W-rated switch works fine for a typical ceiling fan and light combo.
Professional Reviews: Check the best smart switches in 2026 and guides on smart light switches for home automation to see which models users praise for fan control. Look for feedback on app stability, WiFi reliability, and whether voice commands work consistently.
Smart Home Integration and Automation
Once your smart fan light switch is installed and connected, automation is where the real value shows up. Create scenes, preset combinations of settings. A “Movie Night” scene could dim the light to 20% and set the fan to low, while “Bedtime” might turn both off automatically and trigger your porch lights to dim. Geofencing lets the fan turn on when you’re 10 minutes from home, so your living room is already circulating cool air when you arrive on a hot afternoon.
Scheduling is straightforward in most apps: set the fan and light to specific times and settings on weekdays, weekends, or custom days. Some folks set a gentle fan speed for 6–8 a.m. as a natural alarm, ramping up midday cooling. Voice commands tie it all together, no app needed, just a quick phrase.
Integration with weather apps adds another layer. A few premium smart home hubs can trigger the fan based on outdoor temperature, turning it on when it dips below 75°F and turning it off when humidity drops, reducing AC load intelligently. This is cutting-edge territory, but it’s increasingly accessible.
Recent developments in smart home technology show a trend toward tighter ecosystem integration, meaning your fan switch will likely support more platforms and automations in coming updates. Most manufacturers push regular firmware updates to add features and improve stability.
The takeaway: start simple, app control and voice commands, then layer in scenes and schedules once you’re comfortable. Overcomplicating automation right away leads to unused features and frustration.