Upgrading to a Honeywell smart thermostat is one of the quickest wins for modern homeowners looking to cut energy bills and gain convenient temperature control. Unlike older mechanical thermostats, a Honeywell smart thermostat learns your schedule, adjusts automatically, and sends alerts to your phone when something’s amiss. If you’re ready to ditch manual tweaking and let technology handle your heating and cooling, this guide walks you through everything, from deciding if your home’s wiring supports a smart model to programming schedules and troubleshooting hiccups. Whether you’re a DIY veteran or tackling your first smart home upgrade, we’ll keep the jargon clear and the steps practical.
Table of Contents
ToggleKey Takeaways
- A Honeywell smart thermostat learns your schedule and adjusts automatically, typically saving $10–15 monthly by eliminating manual temperature adjustments and reducing energy waste.
- The most critical pre-installation step is checking for a C-wire (common wire); without it, you’ll need an electrician, an adapter, or a battery-powered Honeywell model to avoid installation delays.
- Honeywell smart thermostats integrate seamlessly with Apple Home, Google Home, and Amazon Alexa, enabling remote app control, geofencing automation, and energy usage alerts from anywhere.
- Proper wire installation in the correct order (R, Y, G, W, O/B, C) and testing all heating, cooling, and fan modes prevents common failures and ensures the system switches modes correctly.
- Real energy savings depend on consistent user behavior—setting reasonable setpoints (68–70°F in winter, 76–78°F in summer) and sticking to schedules—plus checking for utility company rebates ($75–200) that offset the upfront cost within two years.
What Makes Honeywell Smart Thermostats Different
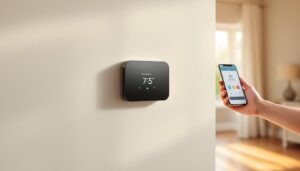
Honeywell smart thermostats stand out because they integrate seamlessly with major smart home platforms, Apple Home, Google Home, and Amazon Alexa, without requiring a separate hub for many models. Unlike basic programmable thermostats that rely on fixed schedules, Honeywell’s adaptive algorithms adjust based on your actual occupancy patterns and outdoor temperature swings. They also offer granular control: you can adjust temperature from anywhere via app, set different schedules for weekdays and weekends, and receive notifications if the system detects heating or cooling failures.
The company’s lineup spans budget-conscious models like the Home T9 (around $200–250) to premium options with moisture sensors and advanced learning. Most models display energy usage in real time, showing how long your system ran and what it cost, turning abstract “saving energy” into concrete numbers. Installation difficulty varies: some models work with basic two-wire systems in older homes, while others demand a C-wire (common wire) to power the device and unlock all features. Knowing your current wiring before buying prevents the “oops, I need an electrician” moment.
Installation & Setup Process
Pre-Installation Checklist
Before you touch anything, turn off power to your existing thermostat at the breaker. Then take a clear photo of your current thermostat’s wiring diagram, usually visible when you remove the cover, and label each wire with painter’s tape (R for red, W for white, Y for yellow, G for green, O/B for orange/blue, and C for common, if present). Write down your current system type: gas furnace with AC, heat pump, or electric resistance heating. This matters because Honeywell models have different compatibility requirements.
Check whether your home has a C-wire already installed. If the current thermostat only uses four wires and lacks a common wire, you’ll either need an electrician to run one from the furnace, use an adapter (if your system supports it), or choose a Honeywell model that operates on batteries. A missing C-wire is the single biggest gotcha for DIY installations, don’t skip this step. Also, make sure the breaker feeding the furnace and AC is in the “on” position and test that your old thermostat still controls temperature before removing it.
Step-By-Step Installation
- Turn off the breaker feeding your HVAC system and confirm it’s off by flipping the thermostat setting to cool and listening, nothing should run. Safety glasses and gloves aren’t strictly necessary, but a headlamp helps you see wire terminals clearly.
- Remove the old thermostat carefully. Most pull away from the wall mount: some are screwed down. Gently unscrew each wire from its terminal, note its color and position, and stuff a piece of painter’s tape over the wall opening to keep dust and insulation out.
- Mount the Honeywell baseplate to the wall. Use the provided drill template or level to ensure it’s square. If there’s a large hole from the old thermostat, the Honeywell’s faceplate usually covers it. Secure it with included anchors and screws, don’t overtighten, or you’ll crack the plastic.
- Connect wires in this order: R (red, 24V power) first, then Y (yellow, cooling), G (green, fan), W (white, heating), O/B (orange, heat pump reverse), and finally C (common, if available). Match each wire to the labeled terminal on the Honeywell. Take a photo before connecting to confirm you got it right.
- Snap the faceplate onto the baseplate until it clicks. Power the system back on at the breaker and press the Honeywell’s power button. The screen should light up within a few seconds. If it doesn’t, recheck the R and C connections, those carry power.
- Run the Honeywell setup wizard on the device screen. You’ll select your system type (gas furnace, heat pump, etc.), set your location for weather data, and connect to Wi-Fi. Follow the prompts carefully: choosing the wrong system type will prevent the thermostat from switching modes correctly.
- Test all modes: Set to heating, confirm the furnace kicks on within 30 seconds: switch to cooling and listen for the AC compressor to engage: toggle the fan to “on” and “auto.” If any mode fails to engage, turn off the breaker, recheck wire connections, and try again.
Key Features & How to Use Them
Once your Honeywell smart thermostat is running, the app becomes your control center. You can set different temperatures for different times of day, morning wake-up, daytime away, evening return, and bedtime sleep, and the system learns which schedules matter most to your actual routine. Geofencing detects when household members leave and arrive home, automatically switching to “away” mode to save energy when everyone’s out, then back to comfort when the first person approaches.
The energy history dashboard shows weekly and monthly usage charts with cost estimates. This feature alone motivates many users to dial back their setpoint by 2°F in winter or bump it up in summer, since you see the impact in dollars immediately. Remote access means you can adjust temperature before arriving home on a cold evening, no more walking into a 62°F house. Humidity control (on select models) helps prevent mold and mildew in damp climates by triggering ventilation if indoor moisture climbs above your threshold.
Alerts notify you of maintenance needs, if the system runs continuously for an unusual period, you’ll get a notification suggesting a clogged filter or system fault. Integration with smart home routines means you can trigger temperature changes as part of an evening “goodnight” command that also locks doors and dims lights. Most users find the app intuitive, but the first week involves toggling a few settings before the thermostat’s learning algorithm kicks in and does the thinking for you. Recent comparisons of smart thermostats in 2026 highlight how Honeywell’s feature set competes directly with Nest and Ecobee on control and automation depth.
Energy Savings & Cost Benefits
A smart thermostat doesn’t magically cut energy bills, your home’s insulation, HVAC age, and climate do most of the heavy lifting. But, removing the friction of manual adjustments typically saves $10–15 per month by reducing heating and cooling when the house is empty or sleeping. Over a year, that’s $120–180: multiply by a 15-year lifespan, and you’re looking at $1,800–2,700 in cumulative savings, which often exceeds the $200–300 installation cost within the first two years.
Honeywell models with adaptive recovery learn how long it takes your furnace to warm the house from 62°F to 72°F on a typical January morning, so they start heating early enough that your home reaches the target temperature right when you wake up, no overshooting energy use. Humidity sensing prevents the AC from running solely to dehumidify when you actually want cooler air, reducing wasted cycles. Smart scheduling that accounts for outdoor temperature swings, say, dropping your nighttime setpoint to 65°F in winter, cuts furnace runtime significantly without discomfort since you’re under blankets anyway.
The CNET review of best smart thermostats emphasizes that real savings depend on user behavior: if you set schedules and stick to reasonable setpoints (68–70°F in winter, 76–78°F in summer), savings compound. If you set your setpoint to 75°F in winter “just to test it out,” your savings evaporate. Regional utility rates and rebates matter too, some electric and gas companies offer $75–200 rebates for installing ENERGY STAR–certified smart thermostats, so check with your provider before purchasing.
Troubleshooting Common Issues
No power or blank screen: This almost always means the C-wire isn’t connected or the wiring is loose. Turn off the breaker, unseat the Honeywell faceplate, confirm the C terminal has a wire and it’s snug, then reconnect. If you still see nothing, your furnace may not have a C-wire installed, you’ll need an adapter or an electrician to run one.
Thermostat controls temperature but app won’t connect: Restart the Wi-Fi setup in the thermostat menu. Ensure your home network is 2.4 GHz (many Honeywell models don’t support 5 GHz): if it’s dual-band, disable the 5 GHz channel temporarily during pairing. Check that your router password is correct and restart the Honeywell by holding the power button for 10 seconds.
Heating or cooling won’t engage: Verify the furnace breaker is on. Check that your HVAC system’s own thermostat wire connections are tight (loose wires at the furnace end cause no-power failures at the thermostat). If the furnace has a service shutoff switch (often near the unit), confirm it’s in the “on” position. Set the thermostat to heat mode, override the schedule by manually bumping the target temperature up 5°F, and listen for the furnace to run within 30 seconds. If nothing happens, the issue is likely at the furnace end, not the thermostat.
Schedule not activating or learning pausing: The app may show a “learning paused” message if you’ve manually adjusted temperature too many times in a day (Honeywell’s algorithm thinks you’re overriding for a reason). Resume learning by tapping the app menu. Alternatively, review your schedule in the app, times are tied to your Wi-Fi connection’s system time, so if your router’s clock drifted, the thermostat runs the wrong schedule. Restart the router to resync time.
Energy cost estimates seem too high or low: These are estimates based on regional utility rates you entered during setup. Leading smart thermostat reviews in 2026 note that estimates vary by region and season. Go to the app settings, confirm your utility’s actual rate per kWh or therm, and update it. You’ll also see an adjustment period of 2–3 weeks as the system learns your usage patterns.