Upgrading to a smart thermostat is one of the most satisfying home improvement projects a DIYer can tackle. Unlike renovations that demand weeks of work, a smart thermostat installation typically takes 30 minutes to an hour, and the payoff is immediate: remote temperature control, energy savings, and a system that learns your habits. Before you order a new unit, though, you’ll need to assess whether your home’s HVAC system plays nicely with smart thermostats, gather the right tools, and follow a methodical approach to avoid wiring mistakes. This guide walks you through the entire process, from compatibility checks to connecting your new thermostat so you can control your home’s climate from anywhere.
Table of Contents
ToggleKey Takeaways
- Smart thermostat installation typically takes 30 minutes to an hour and delivers immediate benefits including remote temperature control and energy savings.
- Verify HVAC system compatibility before purchasing by checking for a C wire (common wire) and consulting the thermostat manufacturer’s compatibility charts to avoid costly installation errors.
- Always turn off HVAC power at the breaker, use a voltage tester to confirm power is off, and photograph your old thermostat’s wiring connections before disconnecting anything.
- Carefully label each wire with masking tape during removal and match them precisely to the new thermostat’s terminals, as loose connections are the leading cause of heating and cooling failures.
- Test your system after installation by setting heating and cooling modes separately to confirm the furnace and air conditioner respond within the expected timeframes.
- If you lack electrical experience or encounter complex wiring issues, hiring a professional smart thermostat installer ($75–200) provides warranty coverage and eliminates troubleshooting risk.
Is Your Home Ready for a Smart Thermostat?
Before you buy a new smart thermostat or start planning a smart thermostat installation, confirm that your HVAC system will work with it. Not all homes are set up the same way, and incompatibility is the leading reason DIYers hit a wall mid-project.
Check Your Current System Compatibility
The first step is examining your current thermostat wiring. Turn off power to your HVAC system at the breaker, then carefully remove the cover of your existing thermostat to see what wires are connected. Most modern homes have common (C) wire, which provides a continuous 24-volt power line. If you see a C wire, typically labeled or colored blue, you’re in good shape. Heat-only systems, cooling-only systems, and heat-pump systems all work with smart thermostats, as long as they’re wired correctly.
If you don’t see a C wire, you have two options: install one yourself by running new wire from your HVAC control board (the “R” terminal), or choose a smart thermostat that works without a C wire using a power-stealing technique. Before proceeding, check the wiring diagram inside your furnace or air handler to understand your system’s layout.
Take a photo of your old thermostat’s wiring before disconnecting anything, this becomes your visual reference guide during installation. Write down the wire colors and their terminal labels (R for red, W for white, Y for yellow, and so on). Different systems use different configurations, and this documentation prevents costly rewiring mistakes.
Also confirm that your chosen smart thermostat model is compatible with your specific HVAC equipment. Most manufacturers (Nest, Ecobee, Honeywell) list compatibility charts on their websites. Checking compatibility before purchase saves frustration and potential return hassles.
Essential Tools and Materials You’ll Need
A smart thermostat installation doesn’t require heavy equipment, but having the right gear on hand prevents trips back and forth to the garage.
Tools:
• Screwdriver (Phillips and flathead)
• Wire strippers (adjustable or sized for 18–24 gauge wire)
• Needle-nose pliers
• Flashlight or headlamp (you’ll be peering into tight spaces)
• Voltage tester (non-contact testers are safest: approximately $10–20)
• Phone or camera (for taking reference photos)
Materials:
• Your new smart thermostat and its documentation
• Wire nuts or terminal connectors (usually included with the thermostat)
• Low-voltage wire (22–24 gauge) if you need to install a C wire
• Tape (masking or electrical tape) for labeling wires
A voltage tester is worth the small investment. Before touching any wires, use it to confirm that power is off. This ten-second check eliminates the risk of electrical shock, non-contact testers light up when they detect current, so you know it’s safe to proceed.
If you’re installing a C wire, buy a 24-gauge low-voltage wire rated for HVAC use. Standard electrical wire is overkill and can be harder to route through tight spaces. Most hardware stores sell spools or pre-cut runs: a 50-foot spool costs $8–15 and covers most residential runs from the furnace to the thermostat location.
Have the new thermostat’s manual and compatibility information nearby. Manufacturers often include quick-reference wiring diagrams that differ from generic instructions, and you’ll want those specifics at your fingertips.
Step-by-Step Installation Process
With your compatibility confirmed and tools gathered, the installation follows a logical sequence. Take your time, rushing is where mistakes happen.
Turn Off Power and Document Your Wiring
Walk to your electrical panel and switch off the breaker feeding your HVAC system. The breaker is usually labeled “Furnace,” “Heat,” or “Air Conditioning.” Flip it to the OFF position and leave it there throughout the project.
Return to your old thermostat and take a clear photo showing all wire connections and their terminal labels. Thermostats can be tricky: the same wire color might mean different things in different systems. Your photo becomes the ground truth if you get confused later.
Use a voltage tester near each terminal to confirm power is off. Touch the tester to the R (red) wire first, the most common live wire, and listen for the beep that indicates current. If the tester doesn’t beep, power is off and you’re safe to proceed. If it does beep, go back to the panel and flip the correct breaker.
Once you’re certain power is off, carefully disconnect each wire from the old thermostat. As you remove them, stick a small piece of masking tape on each wire and label it with its terminal letter (R, C, W, Y, G, and so on). This labeling system is your safeguard against mixed-up connections.
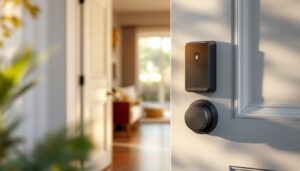
Remove Your Old Thermostat and Install the New One
Unscrew the old thermostat from the wall. Most are held by two or three screws through a mounting plate. Before you pull it away from the wall, note whether there’s a trim ring or decorative collar, these often stay on the wall and slide over the new thermostat’s faceplate, so set them aside.
With the old unit removed, look at the wall opening. If you’re replacing like-with-like (both are wall-mounted), the hole is already the right size. If there’s exposed wire sticking out, gently push it back into the wall cavity or, if depth allows, into a small electrical box.
Take the new thermostat’s mounting plate and hold it up to the opening. Most smart thermostats use standard mounting holes that align with existing holes, though some require a bit of filler or shims. Mark the screw holes with a pencil, then drive the screws (usually provided) into the drywall anchors or into the studs if you’re lucky enough to hit one.
Now comes the critical moment: connecting the wires. Refer to your photo and the new thermostat’s wiring diagram. Match each labeled wire to the corresponding terminal on the new unit. The R wire (24-volt power) connects to R. The C wire (common) connects to C. The W wire (heat) goes to W, Y wire (cooling) to Y, and G wire (fan) to G. Heat pumps add an O or B terminal for reversing valve operation, double-check your manual.
Insert each wire into its terminal slot and tighten the set screw (or push firmly if it’s a spring-loaded connection). Tug gently on each wire to confirm it’s seated. Loose connections cause intermittent heating or cooling failures that are maddening to diagnose later.
Once all wires are connected and secure, double-check against your photo one final time. Then carefully slide the new thermostat faceplate onto the mounting plate and secure it according to the manufacturer’s instructions. Some click in, others are screwed down, your manual will clarify.
Connecting and Configuring Your Smart Thermostat
With the hardware installed, it’s time to bring power back and set up the software. Return to the electrical panel and flip the HVAC breaker back to ON. You should hear a quiet relay click in your furnace or air handler, that’s a good sign.
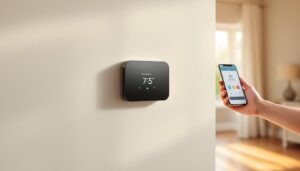
Give the thermostat about 30 seconds to power up. Most smart thermostats display a logo or welcome screen as they boot. Download the thermostat’s companion app (Nest, Ecobee, Honeywell Home, etc.) on your smartphone before you proceed. You’ll need it to connect the thermostat to your WiFi.
Follow the app’s pairing instructions carefully. You’ll typically enter your WiFi network name and password, then add the thermostat to your home automation account. During setup, the thermostat may ask you to choose your system type (heating only, cooling only, heat pump, or dual fuel). Select the correct option, misidentifying your system causes it to behave incorrectly or refuse to turn on.
Once connected, the app will walk you through programming your daily schedule, setting temperature preferences, and enabling any advanced features like geofencing (which learns when you leave and arrive home). For a first run, keep it simple: set heating and cooling set points, and let the system learn your patterns over a week or two.
Perform a test run: set the thermostat to heating mode and raise the temperature 5 degrees above the current room temperature. Wait two minutes and listen for your furnace to ignite. You should hear the blower fan kick on shortly after. If it fires up smoothly, your heating leg is working. Switch to cooling mode (if your system has AC) and lower the temperature by 5 degrees. Your air conditioner compressor should activate within a minute or two. If both systems respond correctly, congratulations, your smart thermostat installation is complete.
If nothing happens, flip the HVAC breaker off again and return to the thermostat to recheck your wire connections. The R and C wires are the most common culprits when a new thermostat won’t power up or respond. According to recent smart home technology news and guides, most installation failures stem from loose wiring rather than defective equipment. Reseating each connection often resolves the issue. For detailed visual guidance, you can reference step-by-step smart thermostat installation instructions that walk through the process. Also, reading expert reviews of the best smart thermostats helps you understand which models are easiest to install and most reliable long-term.
If you’re uncomfortable working with electrical connections, feel the urge to hire a professional, or your system doesn’t have a C wire and you don’t want to run one, hiring a smart thermostat installer near you is the right call. HVAC technicians and electricians offer professional smart thermostat installation services and can handle smart thermostat installation near me requests, they’ll complete the job in an hour and warranty their work. The labor cost (typically $75–200 depending on your region) buys peace of mind and eliminates trial-and-error troubleshooting.